Is Microsoft Planner Useful?

Planner 365 is another of Microsoft’s selling points as they seek to evolve its suite of office tools. Whilst Microsoft 365 Planner has some useful features to make life easier, and we are often asked whether it’s actually worth using it – particularly in Teams.
Since autumn 2020, it had been possible to integrate Microsoft 365 Planner with Teams and was given a new name: Tasks by Planner. The software is also accessible with other native applications within the Microsoft 365 ecosystem. This eliminates the need to switch apps to check what’s next on your to-do list.
This is Planners greatest gift because flicking from one application to another can also cause users to lose concentration and forget what they are looking for. Some people also find too many apps annoying.
With direct access to a task management tool from Microsoft Teams, Outlook, SharePoint and Microsoft To Do, managing projects and organising your day-to-day work goals is easier and arguably helps to nurture mental wellbeing.
When you consider the key benefits Microsoft Planner offers, we would have to say that yes, the planner is worth the effort. Having said that, we do appreciate there are some limitations.
What is Microsoft Planner?
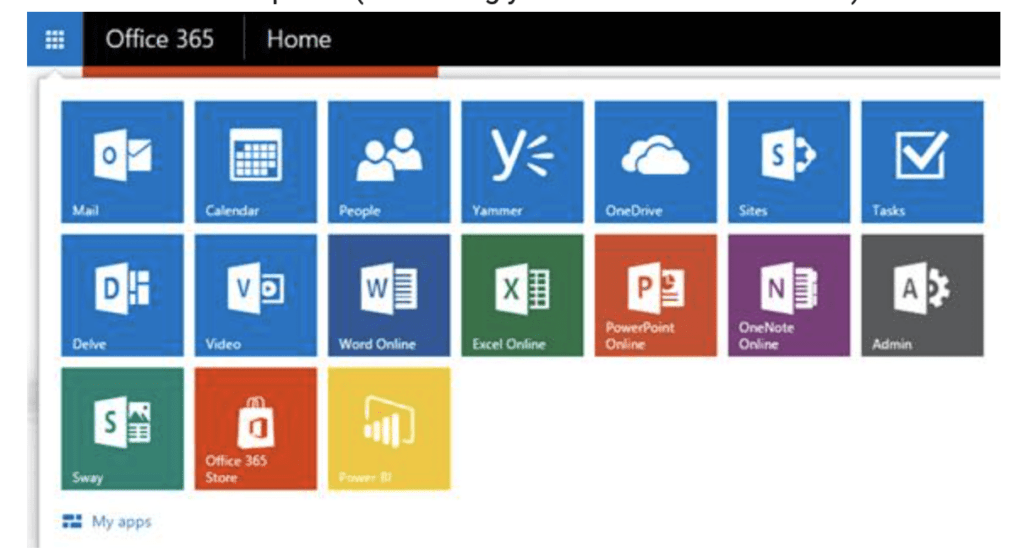
Microsoft 365 Planner is a browser-based app you access directly from your mobile phone or desktop computer from the app launcher or other Office 365 tools.
Planner is included in the Office 365 bundle so it’s available to anyone with a paid Microsoft subscription. Regardless of whether you use Microsoft personal or invested in the extensive range of tools available with any of the Enterprise packages, you will have access to the Microsoft Planner app.
Planner for 365 is essentially a task management tool. The software provides users with a hub where you can create plans, organise workloads, share documents, assign tasks, keep colleagues in the loop and monitor progress updates through a variety of Office 365 dashboards.
Because 365 integrates with Outlook, Teams, SharePoint and To Do, there is no learning curve required. Users that are familiar with Microsoft applications should intuitively figure out how to use it, so you don’t have to waste any time training staff members.
It’s worth noting that Office 365 Planner ties in very closely with Microsoft To Do, but they have slightly different uses. Planner for 365 is used to help you manage work tasks. It’s a project management tool.
To Do is a standalone mobile app task management tool that integrates with 365 Planner and Teams. It’s used to make a note of both personal and professional to-dos so that you can plan your entire day without missing a beat.
You can read more about Microsoft To Do in this article.
To integrate Microsoft Planner with your other 365 applications, go to tasks.office and enter your Office 365 login details. If you’re already logged in, you can access Planner through the Office 365 app launcher.

What Can You Do With Microsoft 365 Planner?
Planner 365 is essentially a lightweight tool that enables project managers and team members to stay on track of tasks daily.
Whilst most tasks management tools are specifically geared towards project managers and team leaders, Microsoft Planner enhances communication across the entire team by keeping everybody in the loop regardless of the Office 365 application they are working in.
In the tool, you can see a visual overview of the entire project. You can create plans, track schedules, make time-management decisions by sharing tasks to your calendar and easily track the progress of tasks you have assigned to other people.
When anyone updates the status of an item, it is shared amongst the entire team. This keeps every team member in the loop and on the same page.
Microsoft Planner 365 Features
By integrating Microsoft Planner you can plan projects and work assignments in advance, track deadlines, keep an eye on the status of projects and boost productivity with timely email notifications that help steer you towards meeting deliverable targets.
Microsoft Planner boasts four key features:
1. Visual Project Management
When you create a plan in Microsoft Planner, a notice board is automatically created. Here you can organise tasks into buckets based on task status – low, medium or high priority – or individuals you have assigned tasks to.
The board gives you an at-a-glance visual of your entire project; assigned tasks, tasks with approaching deadlines, completed tasks and planned tasks that are not yet started.
To update the status of a task or move assignments from one team member to another, you simply drag and drop the item you want to move.
2. Enhance Collaboration
Microsoft Planner enables you to share files with team members and communicate through the 365 chat function whilst still have the detail of your project plan insight. It’s biggest downfall, however, is that you can’t add files whilst you’re in Teams. You have to be in Planner.
Users can also add comments to leave feedback on tasks. This is ideal if a team member has a question relating to a specific task.
Every member of your team or remote workers you have been invited to view the Microsoft Planner app, can also see who is responsible for completing which task. For large projects with multiple teams, this feature can be useful for team members to reach out to the appropriate expert if they have a question or conflict in interests.
3. Email Notifications
Planner for 365 helps project managers and team members to stay on top of their workload. Push notification alerts them to tasks with impending deadlines or appointments they may have at a specific time.
Email notifications can also save project managers time by sending email notifications to the entire team rather than each individual separately.
4. Guest Access
The guest access enables you to invite anyone to Microsoft Planner 365. This is ideal for projects in which you have enlisted the help of freelancers that do not work for your organisation.
There are two levels to guest access. The most basic permission is to invite them as a guest which enables them to see tasks that have been assigned to them together with the deadline, a description of the work and any comments you’ve added.
You can also give them special permissions to utilise other features of the app such as adding files or comments. Sometimes, this is necessary for them to deliver the job.
Using The Microsoft Planner App
Microsoft’s task management tool sits inside the “Planner Hub”. From here, you can create plans or see tasks that have been assigned to you by other people.
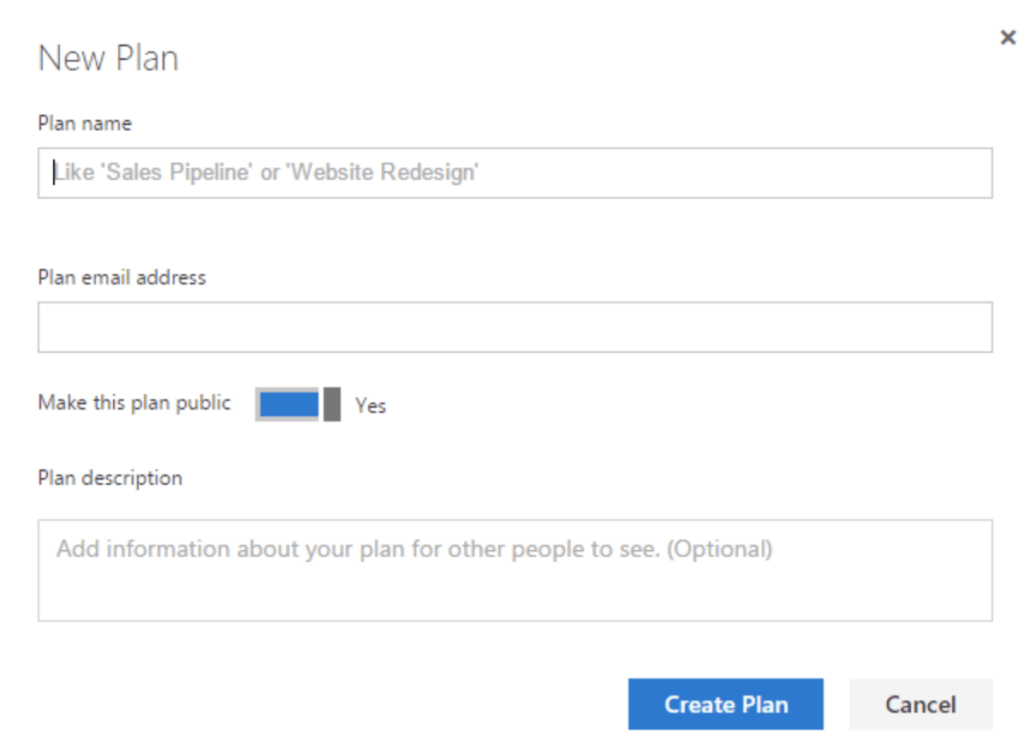
To create a plan, select the “New Plan” tab from the left sidebar in the main menu.
Label your plan with an appropriate title and select who you want to share the plan with other people in your team by selecting whether the plan should be made public or not.

If you do want to make the plan public, enter the email addresses of all the individuals you want to give access to.
Add a brief description of the plan and select Create Plan. This will open up a new panel where you can add tasks. Here you can give tasks a name, add a due date and assign it to an individual within or outside the organisation.
Other options include adding a status, prioritising tasks, leaving comments and adding attachments. To make tasks even more visual, you can add colours that have been assigned to each member of your team.
You can add as many tasks as you need in quick succession. The window will stay open until you close it by simply clicking outside the panel. There is no save option; this is done automatically.
To re-open tasks, click on the task label in the left-sidebar menu. This will give you a snapshot of everything you need to know and notify you if attachments have been added. To exit this window, you have to click on the X in the top right-hand corner.
Once a task is finished, it can be marked as completed. The task will then be filtered in your bucket so it is less visible and your to-do list is less cluttered.
Is There A Microsoft Planner Desktop App?
Planner 365 is a web-based tool. There is no Microsoft Planner desktop app, but it can be accessed from any device through the app launcher.
You can even use the Microsoft Planner app offline. This is useful if you’re on-the-go and want to check updates on your mobile phone or take the opportunity to check progress during a wi-fi outage.
What you can do offline is:
- Add a new task to an existing plan
- Update task properties like progress, start and due dates, notes, comments, and priority
- Add or remove a web link or file attachment
- Add or remove checklist items for a task
- Move tasks between buckets
- Assign a task to another team member
What you can’t do offline is:
- Add a SharePoint item to a task
- Create a new plan
Tips For Using Planner 365
Whilst Planner for 365 is easy to use there are a few shortcuts you can adopt to reduce your workload and organise your project creatively.
If you have a repetitive task that you have created and need to use again, rather than typing out the entire plan again, simply copy the original and make a duplicate.
You do this by selecting the plan you want to copy and clicking on the dropdown menu, which is identified by three dots: “…”. Click “copy plan”.
When you create tasks, you can label them in order of priority. Another option is to label tasks with effort levels instead; “quick tasks”, “medium effort”, and “high effort/strategic”.
You can also rearrange tasks within a plan should you need to move anything up or down the order or add a task that crops up or you originally left out.
Interested in Microsoft Planner Desktop App?
The features offered by the Microsoft Planner will not completely transform the way you work, but it can help you plan, organise and manage important projects.
And given the Planner desktop app comes free with your Office 365 subscription, it doesn’t make sense to pay extra for a third-party management tool that doesn’t offer you much more than Planner.
If you haven’t subscribed to Office 365 yet, or realised the benefits it could offer, from Business Voice in Teams to Security and productivity, contact us and speak to one of our experienced IT professionals for more details.


